#install php 7.2 ubuntu
Explore tagged Tumblr posts
Visit Tumblr Blog
Explore Tumblr blogs with no restrictions, modern design and the best experience.
Last Seen Tumblr Blogs


Fun Fact
Mobile US users spent an average of 115.8 minutes on Tumblr app monthly.
Text
Update your fucking servers or give me free antiacid for the trouble of installing an old-ass PHP in a last-version Ubuntu server
2 notes
·
View notes
Link
#install php ubuntu#install php 7.2 ubuntu#how to install php 7.3 on ubuntu#install php on ubuntu#install latest php version on ubuntu
1 note
·
View note
Link

#curl#install curl#curl on ubuntu#ubuntu tutorials#linux tutorials#php#php tutorial#php 7.2#ubuntu 18.04.2 lts#server tutorial#server side#ubuntu bionic beaver#ubuntu disco dingo#ubuntu 19.04
0 notes
Text
Installing Nginx, MySQL, PHP (LEMP) Stack on Ubuntu 18.04
Ubuntu Server 18.04 LTS (TunzaDev) is finally here and is being rolled out across VPS hosts such as DigitalOcean and AWS. In this guide, we will install a LEMP Stack (Nginx, MySQL, PHP) and configure a web server.
Prerequisites
You should use a non-root user account with sudo privileges. Please see the Initial server setup for Ubuntu 18.04 guide for more details.
1. Install Nginx
Let’s begin by updating the package lists and installing Nginx on Ubuntu 18.04. Below we have two commands separated by &&. The first command will update the package lists to ensure you get the latest version and dependencies for Nginx. The second command will then download and install Nginx.
sudo apt update && sudo apt install nginx
Once installed, check to see if the Nginx service is running.
sudo service nginx status
If Nginx is running correctly, you should see a green Active state below.
● nginx.service - A high performance web server and a reverse proxy server Loaded: loaded (/lib/systemd/system/nginx.service; enabled; vendor preset: enabled) Active: active (running) since Wed 2018-05-09 20:42:29 UTC; 2min 39s ago Docs: man:nginx(8) Process: 27688 ExecStart=/usr/sbin/nginx -g daemon on; master_process on; (code=exited, status=0/SUCCESS) Process: 27681 ExecStartPre=/usr/sbin/nginx -t -q -g daemon on; master_process on; (code=exited, status=0/SUCCESS) Main PID: 27693 (nginx) Tasks: 2 (limit: 1153) CGroup: /system.slice/nginx.service ├─27693 nginx: master process /usr/sbin/nginx -g daemon on; master_process on; └─27695 nginx: worker process
You may need to press q to exit the service status.
2. Configure Firewall
If you haven’t already done so, it is recommended that you enable the ufw firewall and add a rule for Nginx. Before enabling ufw firewall, make sure you add a rule for SSH, otherwise you may get locked out of your server if you’re connected remotely.
sudo ufw allow OpenSSH
If you get an error “ERROR: could find a profile matching openSSH”, this probably means you are not configuring the server remotely and can ignore it.
Now add a rule for Nginx.
sudo ufw allow 'Nginx HTTP'
Rule added Rule added (v6)
Enable ufw firewall.
sudo ufw enable
Press y when asked to proceed.
Now check the firewall status.
sudo ufw status
Status: active To Action From -- ------ ---- OpenSSH ALLOW Anywhere Nginx HTTP ALLOW Anywhere OpenSSH (v6) ALLOW Anywhere (v6) Nginx HTTP (v6) ALLOW Anywhere (v6)
That’s it! Your Nginx web server on Ubuntu 18.04 should now be ready.
3. Test Nginx
Go to your web browser and visit your domain or IP. If you don’t have a domain name yet and don’t know your IP, you can find out with:
sudo ifconfig | grep -Eo 'inet (addr:)?([0-9]*\.){3}[0-9]*' | grep -Eo '([0-9]*\.){3}[0-9]*' | grep -v '127.0.0.1'
You can find this Nginx default welcome page in the document root directory /var/www/html. To edit this file in nano text editor:
sudo nano /var/www/html/index.nginx-debian.html
To save and close nano, press CTRL + X and then press y and ENTER to save changes.
Your Nginx web server is ready to go! You can now add your own html files and images the the /var/www/html directory as you please.
However, you should acquaint yourself with and set up at least one Server Block for Nginx as most of our Ubuntu 18.04 guides are written with Server Blocks in mind. Please see article Installing Nginx on Ubuntu 18.04 with Multiple Domains. Server Blocks allow you to host multiple web sites/domains on one server. Even if you only ever intend on hosting one website or one domain, it’s still a good idea to configure at least one Server Block.
If you don’t want to set up Server Blocks, continue to the next step to set up MySQL.
4. Install MySQL
Let’s begin by updating the package lists and installing MySQL on Ubuntu 18.04. Below we have two commands separated by &&. The first command will update the package lists to ensure you get the latest version and dependencies for MySQL. The second command will then download and install MySQL.
sudo apt update && sudo apt install mysql-server
Press y and ENTER when prompted to install the MySQL package.
Once the package installer has finished, we can check to see if the MySQL service is running.
sudo service mysql status
If running, you will see a green Active status like below.
● mysql.service - MySQL Community Server Loaded: loaded (/lib/systemd/system/mysql.service; enabled; vendor preset: enabled) Active: active (running) since since Wed 2018-05-09 21:10:24 UTC; 16s ago Main PID: 30545 (mysqld) Tasks: 27 (limit: 1153) CGroup: /system.slice/mysql.service └─30545 /usr/sbin/mysqld --daemonize --pid-file=/run/mysqld/mysqld.pid
You may need to press q to exit the service status.
5. Configure MySQL Security
You should now run mysql_secure_installation to configure security for your MySQL server.
sudo mysql_secure_installation
If you created a root password in Step 1, you may be prompted to enter it here. Otherwise you will be asked to create one. (Generate a password here)
You will be asked if you want to set up the Validate Password Plugin. It’s not really necessary unless you want to enforce strict password policies for some reason.
Securing the MySQL server deployment. Connecting to MySQL using a blank password. VALIDATE PASSWORD PLUGIN can be used to test passwords and improve security. It checks the strength of password and allows the users to set only those passwords which are secure enough. Would you like to setup VALIDATE PASSWORD plugin? Press y|Y for Yes, any other key for No:
Press n and ENTER here if you don’t want to set up the validate password plugin.
Please set the password for root here. New password: Re-enter new password:
If you didn’t create a root password in Step 1, you must now create one here.
Generate a strong password and enter it. Note that when you enter passwords in Linux, nothing will show as you are typing (no stars or dots).
By default, a MySQL installation has an anonymous user, allowing anyone to log into MySQL without having to have a user account created for them. This is intended only for testing, and to make the installation go a bit smoother. You should remove them before moving into a production environment. Remove anonymous users? (Press y|Y for Yes, any other key for No) :
Press y and ENTER to remove anonymous users.
Normally, root should only be allowed to connect from 'localhost'. This ensures that someone cannot guess at the root password from the network. Disallow root login remotely? (Press y|Y for Yes, any other key for No) :
Press y and ENTER to disallow root login remotely. This will prevent bots and hackers from trying to guess the root password.
By default, MySQL comes with a database named 'test' that anyone can access. This is also intended only for testing, and should be removed before moving into a production environment. Remove test database and access to it? (Press y|Y for Yes, any other key for No) :
Press y and ENTER to remove the test database.
Reloading the privilege tables will ensure that all changes made so far will take effect immediately. Reload privilege tables now? (Press y|Y for Yes, any other key for No) :
Press y and ENTER to reload the privilege tables.
All done!
As a test, you can log into the MySQL server and run the version command.
sudo mysqladmin -p -u root version
Enter the MySQL root password you created earlier and you should see the following:
mysqladmin Ver 8.42 Distrib 5.7.22, for Linux on x86_64 Copyright (c) 2000, 2018, Oracle and/or its affiliates. All rights reserved. Oracle is a registered trademark of Oracle Corporation and/or its affiliates. Other names may be trademarks of their respective owners. Server version 5.7.22-0ubuntu18.04.1 Protocol version 10 Connection Localhost via UNIX socket UNIX socket /var/run/mysqld/mysqld.sock Uptime: 4 min 28 sec Threads: 1 Questions: 15 Slow queries: 0 Opens: 113 Flush tables: 1 Open tables: 106 Queries per second avg: 0.055
You have now successfully installed and configured MySQL for Ubuntu 18.04! Continue to the next step to install PHP.
6. Install PHP
Unlike Apache, Nginx does not contain native PHP processing. For that we have to install PHP-FPM (FastCGI Process Manager). FPM is an alternative PHP FastCGI implementation with some additional features useful for heavy-loaded sites.
Let’s begin by updating the package lists and installing PHP-FPM on Ubuntu 18.04. We will also install php-mysql to allow PHP to communicate with the MySQL database. Below we have two commands separated by &&. The first command will update the package lists to ensure you get the latest version and dependencies for PHP-FPM and php-mysql. The second command will then download and install PHP-FPM and php-mysql. Press y and ENTER when asked to continue.
sudo apt update && sudo apt install php-fpm php-mysql
Once installed, check the PHP version.
php --version
If PHP was installed correctly, you should see something similar to below.
PHP 7.2.3-1ubuntu1 (cli) (built: Mar 14 2018 22:03:58) ( NTS ) Copyright (c) 1997-2018 The PHP Group Zend Engine v3.2.0, Copyright (c) 1998-2018 Zend Technologies with Zend OPcache v7.2.3-1ubuntu1, Copyright (c) 1999-2018, by Zend Technologies
Above we are using PHP version 7.2, though this may be a later version for you.
Depending on what version of Nginx and PHP you install, you may need to manually configure the location of the PHP socket that Nginx will connect to.
List the contents for the directory /var/run/php/
ls /var/run/php/
You should see a few entries here.
php7.2-fpm.pid php7.2-fpm.sock
Above we can see the socket is called php7.2-fpm.sock. Remember this as you may need it for the next step.
7. Configure Nginx for PHP
We now need to make some changes to our Nginx server block.
The location of the server block may vary depending on your setup. By default, it is located in /etc/nginx/sites-available/default.
However, if you have previously set up custom server blocks for multiple domains in one of our previous guides, you will need to add the PHP directives to each server block separately. A typical custom server block file location would be /etc/nginx/sites-available/mytest1.com.
For the moment, we will assume you are using the default. Edit the file in nano.
sudo nano /etc/nginx/sites-available/default
Press CTRL + W and search for index.html.
Now add index.php before index.html
/etc/nginx/sites-available/default
index index.php index.html index.htm index.nginx-debian.html;
Press CTRL + W and search for the line server_name.
Enter your server’s IP here or domain name if you have one.
/etc/nginx/sites-available/default
server_name YOUR_DOMAIN_OR_IP_HERE;
Press CTRL + W and search for the line location ~ \.php.
You will need to uncomment some lines here by removing the # signs before the lines marked in red below.
Also ensure value for fastcgi_pass socket path is correct. For example, if you installed PHP version 7.2, the socket should be: /var/run/php/php7.2-fpm.sock
If you are unsure which socket to use here, exit out of nano and run ls /var/run/php/
/etc/nginx/sites-available/default
... location ~ \.php$ { include snippets/fastcgi-php.conf; # # # With php-fpm (or other unix sockets): fastcgi_pass unix:/var/run/php/php7.2-fpm.sock; # # With php-cgi (or other tcp sockets): # fastcgi_pass 127.0.0.1:9000; } ...
Once you’ve made the necessary changes, save and close (Press CTRL + X, then press y and ENTER to confirm save)
Now check the config file to make sure there are no syntax errors. Any errors could crash the web server on restart.
sudo nginx -t
nginx: the configuration file /etc/nginx/nginx.conf syntax is ok nginx: configuration file /etc/nginx/nginx.conf test is successful
If no errors, you can reload the Nginx config.
sudo service nginx reload
8. Test PHP
To see if PHP is working correctly on Ubuntu 18.04, let’s a create a new PHP file called info.php in the document root directory. By default, this is located in /var/www/html/, or if you set up multiple domains in a previous guide, it may be located in somewhere like /var/www/mytest1.com/public_html
Once you have the correct document root directory, use the nano text editor to create a new file info.php
sudo nano /var/www/html/info.php
Type or paste the following code into the new file. (if you’re using PuTTY for Windows, right-click to paste)
/var/www/html/info.php
Save and close (Press CTRL + X, then press y and ENTER to confirm save)
You can now view this page in your web browser by visiting your server’s domain name or public IP address followed by /info.php: http://your_domain_or_IP/info.php
phpinfo() outputs a large amount of information about the current state of PHP. This includes information about PHP compilation options and extensions, the PHP version and server information.
You have now successfully installed PHP-FPM for Nginx on Ubuntu 18.04 LTS (Bionic Beaver).
Make sure to delete info.php as it contains information about the web server that could be useful to attackers.
sudo rm /var/www/html/info.php
What Next?
Now that your Ubuntu 18.04 LEMP web server is up and running, you may want to install phpMyAdmin so you can manage your MySQL server.
Installing phpMyAdmin for Nginx on Ubuntu 18.04
To set up a free SSL cert for your domain:
Configuring Let’s Encrypt SSL Cert for Nginx on Ubuntu 18.04
You may want to install and configure an FTP server
Installing an FTP server with vsftpd (Ubuntu 18.04)
We also have several other articles relating to the day-to-day management of your Ubuntu 18.04 LEMP server
Hey champ! - You’re all done!
Feel free to ask me any questions in the comments below.
Let me know in the comments if this helped. Follow Us on - Twitter - Facebook - YouTube.
1 note
·
View note
Text
In this blog post you’ll get to learn how to Install and configure OpenLDAP Server on Ubuntu 22.04|20.04|18.04 LTS. OpenLDAP is a free and open source implementation of the Lightweight Directory Access Protocol developed by the OpenLDAP Project and released under OpenLDAP Public License. Step 1: Set hostname for the Ubuntu server Before you start the installation, set your system hostname: sudo hostnamectl set-hostname ldap.example.com Add the IP and FQDN to file /etc/hosts. $ sudo vim /etc/hosts 192.168.18.50 ldap.example.com Replace ldap.example.com with your correct hostname/valid domain name. Step 2: Install OpenLDAP Server on Ubuntu 22.04|20.04|18.04 When done, install LDAP packages by running the commands below: sudo apt update sudo apt -y install slapd ldap-utils During the installation, you’ll be prompted to set LDAP admin password, provide your desired password, then press Confirm the password and continue installation by selecting with TAB key. You can confirm that your installation was successful using the commandslapcat to output SLAPD database contents. $ sudo slapcat dn: dc=example,dc=com objectClass: top objectClass: dcObject objectClass: organization o: example.com dc: example structuralObjectClass: organization entryUUID: 3096cde2-64b5-103c-836e-1d0b0995a781 creatorsName: cn=admin,dc=example,dc=com createTimestamp: 20220510135944Z entryCSN: 20220510135944.468673Z#000000#000#000000 modifiersName: cn=admin,dc=example,dc=com modifyTimestamp: 20220510135944Z Step 3: Add base dn for Users and Groups The next step is adding a base DN for users and groups. Create a file named basedn.ldif with below contents: $ vim basedn.ldif dn: ou=people,dc=example,dc=com objectClass: organizationalUnit ou: people dn: ou=groups,dc=example,dc=com objectClass: organizationalUnit ou: groups Replace example and com with your correct domain components. Now add the file by running the command: $ ldapadd -x -D cn=admin,dc=example,dc=com -W -f basedn.ldif Enter LDAP Password: adding new entry "ou=people,dc=example,dc=com" adding new entry "ou=groups,dc=example,dc=com" Step 4: Add User Accounts and Groups Generate a password for the user account to add. $ sudo slappasswd New password: Re-enter new password: SSHAZn4/E5f+Ork7WZF/alrpMuHHGufC3x0k Create ldif file for adding users. $ vim ldapusers.ldif dn: uid=computingpost,ou=people,dc=example,dc=com objectClass: inetOrgPerson objectClass: posixAccount objectClass: shadowAccount cn: computingpost sn: Wiz userPassword: SSHAZn4/E5f+Ork7WZF/alrpMuHHGufC3x0k loginShell: /bin/bash uidNumber: 2000 gidNumber: 2000 homeDirectory: /home/computingpost Replace computingpost with the username to add dc=example,dc=com with your correct domain values. cn & sn with your Username Values SSHAZn4/E5f+Ork7WZF/alrpMuHHGufC3x0k with your hashed password When done with edit, add account by running. $ ldapadd -x -D cn=admin,dc=example,dc=com -W -f ldapusers.ldif Enter LDAP Password: adding new entry "uid=computingpost,ou=people,dc=example,dc=com" Do the same of group. Create ldif file: $ vim ldapgroups.ldif dn: cn=computingpost,ou=groups,dc=example,dc=com objectClass: posixGroup cn: computingpost gidNumber: 2000 memberUid: computingpost Add group: $ ldapadd -x -D cn=admin,dc=example,dc=com -W -f ldapgroups.ldif Enter LDAP Password: adding new entry "cn=computingpost,ou=groups,dc=example,dc=com" You can combine the two into single file. Step 5: Install LDAP Account Manager – Recommended I noticed phpLDAPadmin doesn’t work well with PHP 7.2+. I recommend you use LDAP Account Manager instead. Follow our guide below to install and configure LDAP Account Manager. Install and configure LDAP Account Manager on Ubuntu The guide also shows you how to add user accounts and groups to your LDAP server. Step 6: Configure your Ubuntu 22.04|20.04|18.04 as LDAP Client The last step is to configure the systems in your network to authenticate against the LDAP server we’ve just configured:
Configure LDAP Client on Ubuntu Step 7: Securing LDAP Server/Client Secure your LDAP Server and access from LDAP Client with TLS/SSL: Secure LDAP Server with SSL/TLS on Ubuntu Wrapping Up Thanks for using our guide to install and configure OpenLDAP server on your Ubuntu. I recommend installing and using LDAP Account Manager to administer your LDAP server through a web interface.
0 notes
Text
How to Install PHP on Ubuntu 20.04
How to Install PHP on Ubuntu 20.04
PHP 7.4 is the latest stable release available. Say thanks to Ondřej Surý for maintaining PPA of most the popular PHP versions on launchpad. If you want to install a specific or multiple version of PHP, then this article can be helpful for you. This article will help you to install PHP 7.4, 7.3, 7.2 and 5.6 on Ubuntu 20.04 (Focal Fossa) via PPA. Read: How to Install PHP 7 on Debian via PPA You…
View On WordPress
0 notes
Text
How to install php 7.2 or 7.3 on ubuntu
https://www.tutsmake.com/install-php-7-on-ubuntu-18-04-php-7-2-3/
1 note
·
View note
Text
How to Install PHP 7 on Ubuntu 20.04 Linux Operating System
How to Install PHP 7 on Ubuntu 20.04 Linux Operating System
The Ubuntu 20.04 Operating system comes with PHP version 7.0, and you can install like any other application package using the apt package manager. Today, in this article, we will learn to install PHP 7.2 on Ubuntu 20.04 machine. Prerequisites To perform practical stuff of this tutorial, make sure you have Ubuntu 20.04 installed machine and user to log in on system with sudo privileges. Install…

View On WordPress
0 notes
Text
Actualizar PHP 7.0 a 7.2 en Ubuntu 16.04
Utilizar DigitalOcean como host para servidores es de gran ayuda en la facilidad de poner en funcionamiento los deployments y los excelentes precios que ofrecen. También ofrecen aplicaciones de un click para obtener un servidor LAMP en Ubuntu 16.04 sin preocuparse por la instalación y configuración de todo el software necesario. Como trabajo en una estación con el mismo sistema operativo, es una opción ideal. El único problema que tengo en este momento es que Ubuntu 16.04 solo tiene acceso a PHP 7.0 en repositorios apt-get predeterminados.
PHP 7.1 ya salió, y Laravel 5.6 necesita que se instale (gracias a un paquete de Doctrine), ¡así que vamos a instalarlo!.
Añadir el repositorio PPA Ondrejs
$ sudo add-apt-repository ppa:ondrej/php $ sudo apt-get update
Instalar PHP 7.1
Vamos a detener nuestro servidor primero, luego instalamos PHP 7.1.
$ service apache2 stop $ sudo apt-get install php7.1 php7.1-common
También instalaremos algunos paquetes adicionales para nuestra instalación de PHP. ¡Estos son necesarios para Laravel y Composer!
$ sudo apt-get install php7.1-curl php7.1-xml php7.1-zip php7.1-gd php7.1-mysql php7.1-mbstring
Una vez hecho esto, verificamos que PHP se actualice en la CLI
$ php -v
Si la primera fila se ve así, ¡hasta ahora lo hemos hecho bien!
PHP 7.2.4–1+ubuntu16.04.1+deb.sury.org+1 (cli) (built: Apr 5 2018 08:53:57) ( NTS )
Remover PHP 7.0
Ahora tenemos PHP7.2, vamos a deshacernos de PHP7.0
$ sudo apt-get purge php7.0 php7.0-common
Una vez hecho esto, reiniciamos el servidor.
$ sudo shutdown -r now
Hacer que Apache utilice PHP7.2
Finalmente, indicamos a Apache que use PHP7.2 ahora que ya no se está utilizando PHP 7.0. Esto Permite habilitar el mod PHP!
$ sudo a2enmod php7.2 $ service apache2 restart
Eso es todo, PHP ahora debería usar PHP 7.2. ¡Disfruta de tus nuevas características increíbles, como los tipos de devolución de funciones y las múltiples capturas de error!
1 note
·
View note
Text
Welcome to this guide on how to install and Manage WordPress Website on Linux using WordOps. WordPress is a free and open-source PHP-based Content Management System developed by Matt Mullenweg and Mike Little in 2003. This simple and extensive CMS is used to create powerful and appealing websites with no programming knowledge required. There are several methods to install WordPress as illustrated in the guides below: Setup WordPress Website on Arch Linux / Manjaro Install WordPress with Nginx on Ubuntu / Debian How To Setup WordPress Multisite on Ubuntu WordOps is a tool that eases the WordPress installation and site administration with the following features: Easy to install: One step automated installer with migration from EasyEngine v3 support Powerful: Optimized Nginx configurations with multiple cache backends support Up-to-date: PHP 7.2, 7.3, 7.4, 8.0 & 8.1 – MariaDB 10.5 & Redis 6.0 SSL support: Domain, Subdomain & Wildcard Let’s Encrypt SSL certificates with DNS API support Custom Nginx build: Nginx 1.18.0 – TLS v1.3 Cloudflare HTTP/2 HPACK & Brotli support Fast deployment: Fast and automated WordPress, Nginx, PHP, MySQL & Redis installation User Friendly: WordOps dashboard with server status/monitoring and tools demo Offers Monitoring: Live Nginx virtual host traffic with ngx_vts_module and server monitoring with Netdata System Requirements WordOps can be installed on the following systems: Ubuntu 20.04 LTS (Focal) Ubuntu 18.04 LTS (Bionic) It is also compatible with the following systems. Debian 9 (Stretch) & Debian 10 (Buster) Raspbian 9 (Stretch) & Raspbian 10 (Buster) 1. Install WordOps on Linux WordOps can be installed using the command: wget -qO wo wops.cc && sudo bash wo Sample Output: Welcome to WordOps install/update script v3.14.1 Installing wo dependencies [OK] Installing WordOps [OK] Running post-install steps [OK] WordOps (wo) require an username & and an email address to configure Git (used to save server configurations) Your informations will ONLY be stored locally Enter your name: admin Enter your email: [email protected] Synchronizing wo database, please wait... WordOps (wo) installed successfully To enable bash-completion, just use the command: bash -l To install WordOps recommended stacks, you can use the command: wo stack install To create a first WordPress site, you can use the command: wo site create site.tld --wp WordOps Documentation : https://docs.wordops.net WordOps Community Forum : https://community.wordops.net WordOps Community Chat : https://chat.wordops.net Give WordOps a GitHub star : https://github.com/WordOps/WordOps/ 2. Install WordPress using WordOps. Creating a WordPress site using WordOps is so easy. The below command can be used to create a WordPress site on your domain name. sudo wo site create domain_name --wp When creating a site, you can specify the PHP version, Redis cache, cache enabler e.t.c using the below flags. # install wordpress with latest PHP 8.0 without any page caching sudo wo site create example.com --wp #install wordpress with PHP 8.1 without any page caching sudo wo site create example.com --wp --php81 # install wordpress + nginx fastcgi_cache sudo wo site create example.com --wpfc # install wordpress + nginx redis_cache sudo wo site create example.com --wpredis # install wordpress with WP-Rocket plugin sudo wo site create example.com --wprocket # install wordpress with Cache-enabler plugin sudo wo site create example.com --wpce # install wordpress with wp-super-cache plugin sudo wo site create example.com --wpsc To create a WordPress site with multisite with subdirectory, add the --wpsubdirflag to the above commands. For example, to install wpmu-subdirectory with the wp-super-cache plugin, the command will be: wo site create example.com --wpsubdir --wpsc
Also, you can create a WordPress multisite with a subdomain using the --wpsubdomain flag for example: wo site create example.com --wpsubdomain In this guide, I will demonstrate how to create a WordPress site on wordpress.example.com with PHP8.0. The command will be; sudo wo site create wordpress.example.com --wp Sample command execution output: This command installs and configures Nginx, MySQL database, PHP, and WordPress. Once complete, view the info about your site: sudo wo site info wordpress.example.com Sample Output: 3. Access the WordPress Site Access the WordPress site using the URL http://domain_name Visit the WordPress admin console with the URL http://domain_name/wp-admin On this page, log in using the created credentials provided during the installation. On successful authentication, you should see the WordPress admin dashboard as below. Once here, change the default password for the admin user, to create one of your own. Navigate to the users tab and click edit for the admin user. Set the preferred password and save the changes. That is it! You have successfully set up the WordPress Website on Linux using WordOps. 4. Manage WordPress Website on Linux using WordOps There are other configurations/management options you can easily make to your WordPress site with WordOps. The configuration you can make are; Switch between PHP versions With WordOps, you can easily switch between PHP versions on your created WordPress site. The possible commands are: # Switch to PHP 7.2 sudo wo site update example.com --php72 # switch to PHP 7.3 sudo wo site update example.com --php73 # switch to PHP 7.4 sudo wo site update example.com --php74 # switch to PHP 8.0 sudo wo site update example.com --php80 # switch to PHP 8.1 sudo wo site update example.com --php81 For example, switching our created site to PHP 8.1, we will use the command: sudo wo site update wordpress.example.com --php81 Sample Output: If you get an error “Oops Something went wrong!!“, view the logs using the command: $ tail /var/log/wo/wordops.log E: Could not get lock /var/lib/dpkg/lock-frontend. It is held by process 32655 (unattended-upgr) E: Unable to acquire the dpkg frontend lock (/var/lib/dpkg/lock-frontend), is another process using it? 2022-04-23 11:33:23,782 (INFO) wo : Oops Something went wrong!! Kill the process, then proceed and update the PHP version sudo kill -9 32655 sudo wo site update wordpress.example.com --php81 Once the upgrade is successful, verify the new PHP version using the command: sudo wo site info wordpress.example.com Sample Output: Secure WordPress with Let’s Encrypt You can use WordOps to secure the created site with Let’s Encrypt SSL certificates. Normally, the -le flag is used to issue Let’s Encrypt SSL certificates for your domain name. The possible commands here are: # Install wordpress & letsencrypt wo site create example.com --wp -le # Install wordpress & letsencrypt subdomain wo site create sub.example.com --wp -le # Install wordpress & letsencrypt with HSTS wo site create example.com --wp --letsencrypt --hsts # Install wordpress & wildcard SSL certificate with Cloudflare DNS API wo site create example.com --wp -le=wildcard --dns=dns_cf You can also issue Let’s Encrypt certificates manually by installing the required packages and proceeding as below: sudo apt install certbot python3-certbot-nginx sudo certbot --nginx Sample Output: Saving debug log to /var/log/letsencrypt/letsencrypt.log Plugins selected: Authenticator nginx, Installer nginx Enter email address (used for urgent renewal and security notices) (Enter 'c' to cancel): [email protected] - - - - - - - - - - - - - - - - - - - - - - - - - - - - - - - - - - - - - - - - Please read the Terms of Service at https://letsencrypt.org/documents/LE-SA-v1.2-November-15-2017.pdf. You must agree in order to register with the ACME server at https://acme-v02.api.letsencrypt.org/directory
- - - - - - - - - - - - - - - - - - - - - - - - - - - - - - - - - - - - - - - - (A)gree/(C)ancel: a - - - - - - - - - - - - - - - - - - - - - - - - - - - - - - - - - - - - - - - - Would you be willing to share your email address with the Electronic Frontier Foundation, a founding partner of the Let's Encrypt project and the non-profit organization that develops Certbot? We'd like to send you email about our work encrypting the web, EFF news, campaigns, and ways to support digital freedom. - - - - - - - - - - - - - - - - - - - - - - - - - - - - - - - - - - - - - - - - (Y)es/(N)o: y Which names would you like to activate HTTPS for? - - - - - - - - - - - - - - - - - - - - - - - - - - - - - - - - - - - - - - - - 1: wordpress.example.com 2: www.wordpress.example.com - - - - - - - - - - - - - - - - - - - - - - - - - - - - - - - - - - - - - - - - Select the appropriate numbers separated by commas and/or spaces, or leave input blank to select all options shown (Enter 'c' to cancel): 1 Requesting a certificate for wordpress.example.com Performing the following challenges: http-01 challenge for wordpress.example.com Waiting for verification... Cleaning up challenges ... Please choose whether or not to redirect HTTP traffic to HTTPS, removing HTTP access. - - - - - - - - - - - - - - - - - - - - - - - - - - - - - - - - - - - - - - - - 1: No redirect - Make no further changes to the webserver configuration. 2: Redirect - Make all requests redirect to secure HTTPS access. Choose this for new sites, or if you're confident your site works on HTTPS. You can undo this change by editing your web server's configuration. - - - - - - - - - - - - - - - - - - - - - - - - - - - - - - - - - - - - - - - - Select the appropriate number [1-2] then [enter] (press 'c' to cancel): 2 .... Successfully received certificate. Certificate is saved at: a2enmod ssl /etc/letsencrypt/live/wordpress.example.com/fullchain.pem Key is saved at: /etc/letsencrypt/live/wordpress.example.com/privkey.pem This certificate expires on 2022-07-18. These files will be updated when the certificate renews. Certbot has set up a scheduled task to automatically renew this certificate in the background. - - - - - - - - - - - - - - - - - - - - - - - - - - - - - - - - - - - - - - - - If you like Certbot, please consider supporting our work by: * Donating to ISRG / Let's Encrypt: https://letsencrypt.org/donate * Donating to EFF: https://eff.org/donate-le - - - - - - - - - - - - - - - - - - - - - - - - - - - - - - - Once SSL certificates are generated, proceed and access the site via HTTPS Update WordOps to the latest version using the command: wo update Conclusion We have successfully gone through how to install and Manage WordPress Websites on Linux using WordOps. We can all agree that WordOps makes it easy to install and manage WordPress sites. I hope this was significant.
0 notes
Link
0 notes
Text
WordPress: WordPress prend en charge PHP 7.2 - Voici comment installer sur Ubuntu avec le support Nginx et MariaDB
WordPress: WordPress prend en charge PHP 7.2 – Voici comment installer sur Ubuntu avec le support Nginx et MariaDB
[sc name=”lws-baniere-728×90-hebergement-wordpress”]
La récente version de maintenance de WordPress ajoute le support de PHP 7.2… Si vous vous demandez comment l’installer sur Ubuntu 16.04 LTS / 17.04 | 17.10, les étapes ci-dessous vous montrent comment…
WordPress, le système de gestion de contenu (CMS) le plus puissant et le plus populaire, est le bon outil pour développer et construire des…
View On WordPress
0 notes
Text
Como instalar la extensión mcrypt en php 7.4 con Ubuntu

Como instalar la extensión mcrypt en php 7.4, en un servidor con Ubuntu 18.04, Ubuntu 20.04 o Debian 9 / 10. Desde la versión php-7.2, el módulo mcrypt no está incluido por defecto en php. Si lo intentas instalar obtendrás el error "no se puede encontrar el paquete" o "no hay candidatos para la instalación". La extensión mcrypt es una interfaz para la biblioteca de criptografía mcrypt, que está incluida desde las versiones PHP 5.4 a PHP 7.1. A partir de PHP 7.2, mcrypt ya no es mantenido y se mueve a extensión PECL no oficial (comunitaria). Suponemos que fue desechada como extensión oficial por motivos de seguridad, sin embargo, algunas aplicaciones desarrolladas en PHP aún dependen de este módulo para funcionar correctamente. Un ejemplo claro lo tenemos en el servidor de archivos OwnClod.
Instalar la extensión mcrypt en php 7.4
En este artículo vemos como instalar la extensión mcrypt en PHP 7.4, pero es valido para otras versiones siempre que cambies la versión de php. Para comenzar a instalar la extensión mcrypt en un servidor Ubuntu o Debian, sigue los pasos indicados a continuación: Comenzamos por los requisitos previos. sudo apt-get install php-dev libmcrypt-dev gcc make autoconf libc-dev pkg-config php-pear Ahora actualizamos pecl e instalamos la última versión de mcrypt (requiere php 7.2 o superior). sudo pecl channel-update pecl.php.net sudo pecl install mcrypt-1.0.3 Al concluir la instalación aparece un mensaje que nos avisa que tenemos que agregar la extensión al php.ini. Ejemplo... Build process completed successfully Installing '/usr/lib/php/20190902/mcrypt.so' install ok: channel://pecl.php.net/mcrypt-1.0.3 configuration option "php_ini" is not set to php.ini location You should add "extension=mcrypt.so" to php.ini Puedes agregar la extensión de forma automática o manual. Yo prefiero la manual, pero si quieres automatizar el proceso sería algo similar al siguiente comando (en Apache). echo "extension=mcrypt.so" | sudo tee -a /etc/php/7.4/apache2/conf.d/mcrypt.ini De forma manual lo haremos más completo, por eso la recomiendo. Agregamos la extensión a php 7.4. sudo nano /etc/php/7.4/cli/php.ini Justo al principio del archivo, debajo de copia y pega lo siguiente. extension=mcrypt.so Guarda el archivo y cierra el editor. Vemos una imagen de ejemplo...
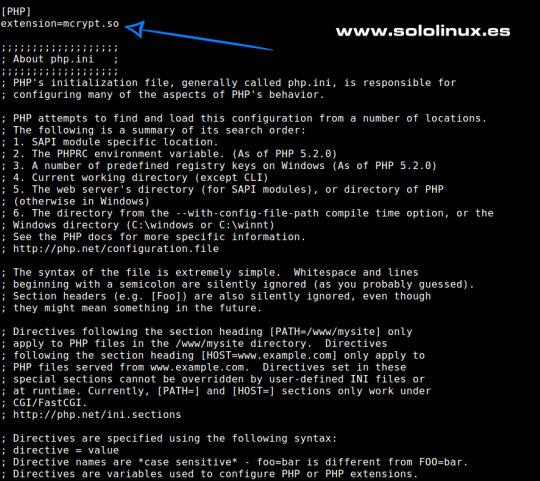
Modulo mcrypt en php.ini Si vamos a utilizar php en un servidor Apache, haremos la misma operación anterior en Apache2. sudo nano /etc/php/7.4/apache2/php.ini Si vamos a utilizar php en un servidor Nginx, haremos la misma operación anterior en fpm. sudo nano /etc/php/7.4/fpm/php.ini NO te olvides de reiniciar tu servidor elegido para que tome la nueva configuración. # Apache sudo systemctl restart apache2 # Nginx sudo systemctl restart nginx Canales de Telegram: Canal SoloLinux – Canal SoloWordpress Espero que este articulo te sea de utilidad, puedes ayudarnos a mantener el servidor con una donación (paypal), o también colaborar con el simple gesto de compartir nuestros artículos en tu sitio web, blog, foro o redes sociales. Instalar la extensión mcrypt. Read the full article
#apache2#extensiónmcrypt#fpm#instalarlaextensiónmcrypt#mcryptenphp7.4#módulomcrypt#php#PHP7.4#Ubuntu18.04#Ubuntu20.04
0 notes
Photo

How do I install PHP in my computer ?
My previous post shown you an overview of PHP and its working mechanism. Today I am going to show you how you can install PHP and other assisting software in your machine locally. You would be working on your own web server soon. Cheers..!!
Table of Contents
How do I install PHP on Windows 10 ?
How do I install PHP on Linux-Ubuntu 16.04/18.04 ?
–What is PHP CGI exe?
How to install Apache ?
Step 2: Install PHP 7.2 & PHP Extensions
Step 3: Check the PHP installation
How to switch between 2 PHP versions in the same machine ?
Do I need to install other softwares too after PHP installation ?
Step 1: Install Ondřej Surý’s PPA
#php#php programming#programming#installation#linux#ubuntu#windows#mac#apple#itsolutionstuff#appdividend#decodewebin#Redis vs MySQL#shared hosting#cheap hosting#web development tutorial for beginners#guide#Wattpad#issuu#pinterest#twitter#facebook
0 notes